Common Bench Press Mistakes and How to Fix Them
Identify and correct the 10 most common bench press mistakes. Learn what causes these errors, why they're problematic, and how to fix them for better results.
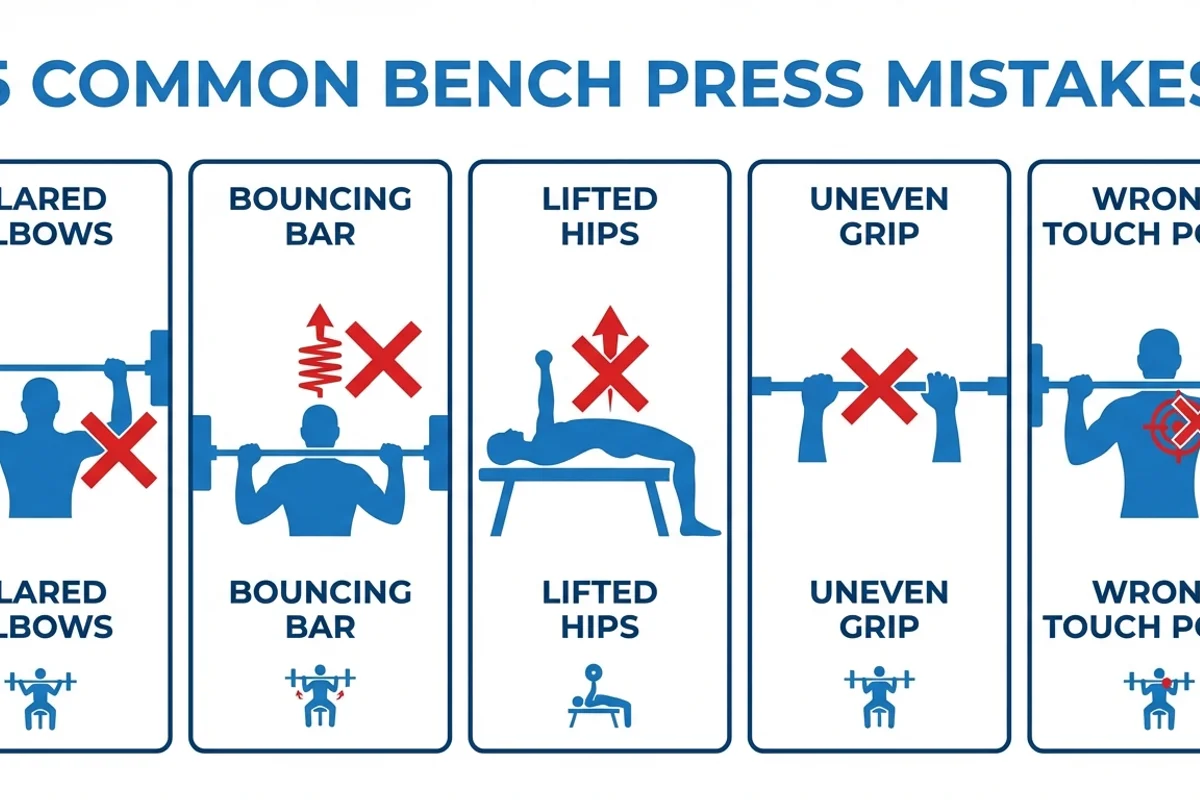
The bench press looks simple, but small technique errors can limit your strength and lead to injury. Here are the 10 most common bench press mistakes and exactly how to fix them.
Mistake 1: Flaring Elbows Too Wide
What It Looks Like
Elbows pointing straight out to the sides, forming a 90-degree angle with your torso at the bottom of the lift.
Why It's a Problem
- Places excessive stress on the shoulder joint
- Increases risk of pec tears
- Reduces power output
- Can lead to shoulder impingement over time
How to Fix It
Keep your elbows at a 45-75 degree angle from your torso. Think of tucking your elbows toward your hips as you lower the bar.
Cue to remember: "Pack your elbows" or "Show your armpits to the floor"
Mistake 2: Bouncing the Bar Off Your Chest
What It Looks Like
The bar crashes into the chest and bounces back up without a controlled pause.
Why It's a Problem
- Uses momentum instead of muscle
- Risk of sternum or rib injury
- Cheats the stretch reflex naturally
- Makes progressive overload difficult to track
How to Fix It
Lower the bar under control (2-3 seconds) and touch your chest lightly. You can either pause briefly or immediately reverse, but never bounce.
Cue to remember: "Touch, don't crash" or "Kiss the chest"
Mistake 3: Lifting Hips Off the Bench
What It Looks Like
Hips rise off the bench during the pressing phase, creating excessive arch.
Why It's a Problem
- Turns the movement into a decline press
- Reduces range of motion artificially
- Against competition rules (if you compete)
- Puts spine in compromised position
How to Fix It
Keep your glutes in contact with the bench throughout the lift. If you can't press the weight without lifting your hips, reduce the load.
Cue to remember: "Squeeze the bench with your glutes" or "Drive your hips down"
Mistake 4: Uneven Bar Path
What It Looks Like
One side of the bar moves faster or higher than the other. The bar may tilt or wobble.
Why It's a Problem
- Creates muscle imbalances
- Indicates existing strength asymmetry
- Increases injury risk on the weaker side
- Limits total weight you can lift
How to Fix It
Use dumbbells for a few weeks to identify and address imbalances. Film yourself from the front to check symmetry. Focus on pressing equally through both hands.
Cue to remember: "Push the bar as one unit" or "Even pressure, even path"
Mistake 5: Grip Too Wide or Too Narrow
What It Looks Like
Hands positioned at extreme ends of the bar or very close together without intention.
Why It's a Problem
- Too wide: Excessive shoulder stress, reduced tricep contribution
- Too narrow: Excessive tricep focus, reduced chest activation, longer range of motion
How to Fix It
Start with hands approximately 1.5x shoulder width. Adjust based on your goals and any discomfort, but stay within a reasonable range.
Cue to remember: Index or middle finger on the knurling rings (81cm marks)
Mistake 6: Not Retracting Shoulder Blades
What It Looks Like
Shoulders are rounded forward, upper back is flat against the bench, shoulder blades are loose.
Why It's a Problem
- Unstable pressing surface
- Shoulder impingement risk
- Reduced power transfer
- Limited lat engagement
How to Fix It
Before unracking, squeeze your shoulder blades together and pull them down toward your back pockets. Maintain this position throughout every rep.
Cue to remember: "Pinch a pencil between your shoulder blades" or "Chest up, shoulders back and down"
Mistake 7: Wrong Touch Point on Chest
What It Looks Like
Bar touches too high (near the neck) or too low (on the stomach).
Why It's a Problem
- Too high: Shoulder strain, difficult bar path
- Too low: Reduced chest activation, inefficient mechanics
How to Fix It
Touch the bar between your nipple line and the bottom of your sternum. The exact spot depends on your grip width and arm length.
Cue to remember: "Lower chest for lower bar path" or "Touch where the bar naturally wants to go"
Mistake 8: Incomplete Range of Motion
What It Looks Like
Stopping the bar several inches above the chest or not fully locking out at the top.
Why It's a Problem
- Reduces muscle stretch and activation
- Limits strength gains through full ROM
- Can create weak points in the lift
- Doesn't count in competition
How to Fix It
Unless intentionally doing board presses or pin presses, take every rep through full range. Touch your chest and fully extend your elbows.
Cue to remember: "Chest to lockout, every rep"
Mistake 9: Pressing Straight Up (Not J-Curve)
What It Looks Like
The bar travels in a straight vertical line from chest to lockout.
Why It's a Problem
- Inefficient bar path
- More shoulder stress
- Reduces lat engagement
- Harder to lock out
How to Fix It
Press the bar up AND slightly back toward your face. The bar path should follow a J-curve: diagonal up from the chest, finishing over your shoulders.
Cue to remember: "Push up and back" or "Drive toward your face"
Mistake 10: Holding Breath Incorrectly
What It Looks Like
Breathing out on the way down, or holding breath for multiple reps without resetting.
Why It's a Problem
- Loss of core stability
- Reduced strength output
- Dizziness on heavy sets
- Inconsistent performance
How to Fix It
For heavy sets: Take a deep belly breath at lockout, hold through the descent and press, exhale at lockout. Reset breathing for each rep.
Cue to remember: "Breathe at the top, brace through the rep"
Self-Assessment Checklist
Film yourself and check for these issues:
- Elbows at 45-75 degrees, not 90
- Bar touches chest under control, no bounce
- Glutes stay on bench throughout
- Bar path is symmetrical
- Grip width is consistent and appropriate
- Shoulder blades are retracted and depressed
- Touch point is on lower chest
- Full range of motion on every rep
- Bar follows J-curve, not straight line
- Breathing is coordinated with the lift
When to Deload and Fix Form
Consider reducing weight by 20-30% to work on technique if:
- You've been making the same mistakes consistently
- You recently increased weight significantly
- You're experiencing pain or discomfort
- Your progress has stalled despite effort
- You're returning from a layoff
It's better to temporarily lift lighter with perfect form than to continue building strength on a foundation of bad habits.
Related Guides
- How to Bench Press - Complete technique breakdown
- Bench Press Muscles Worked - Understand the movement
- Bench Press Safety Guide - Train safely
- How to Increase Your Bench Press - Break through plateaus
- Bench Press Calorie Calculator - Track your workouts